
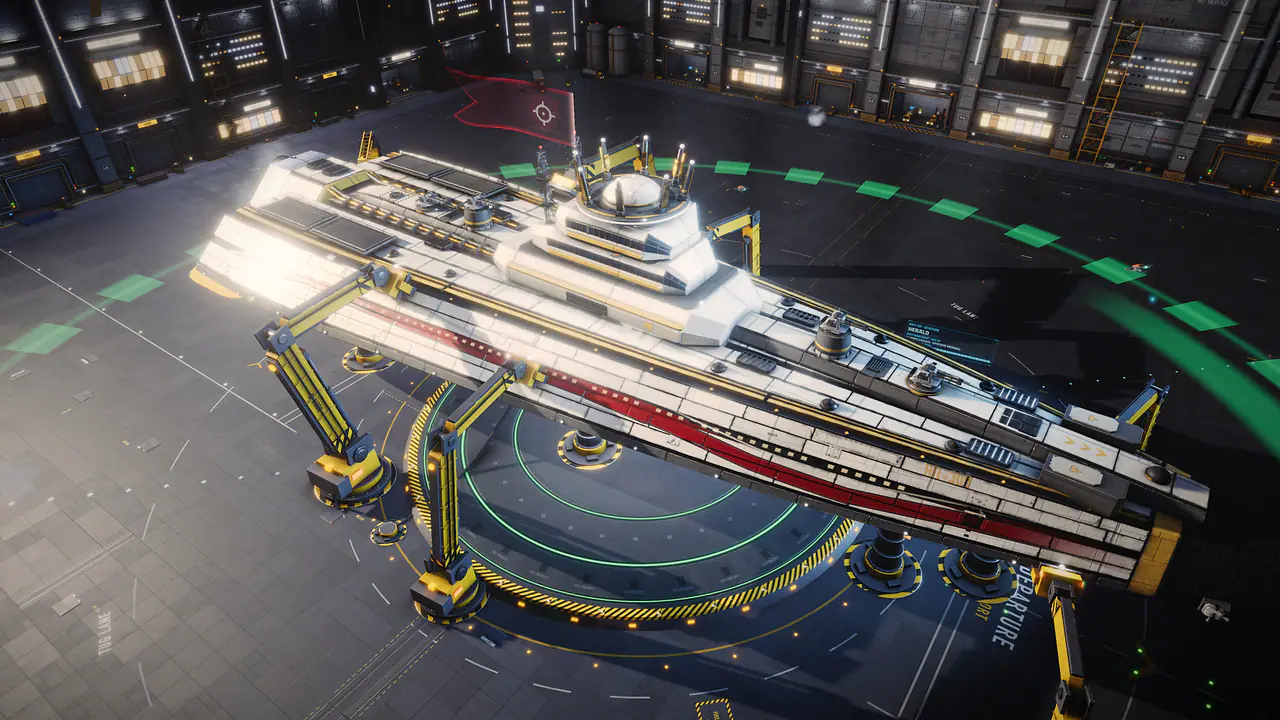
Hull classes#
Every hull belongs to a class that tells you what it is for. Tier is the hull's place on the progression ladder: tier 1 hulls need little or no training, while the highest tiers need very high levels in several skills.
| Class | Tier | Hulls | What it is for |
|---|---|---|---|
| Circuit Ship | 1 | Fairwind | A pure racing hull for the Racing Ports: very fast, very fragile. |
| Outrider | 1 | Dartwing | The fastest combat hulls, built to run targets down. |
| Pathfinder | 1 to 3 | Wayfarer, Gleaner, Astrolabe, Longsight | Fast-warping hulls for sites, salvage and charting. |
| Prospector | 1 to 2 | Delver, Furrow, Hewer | Mining hulls with big ore holds and mining mounts. |
| Skirmisher | 1 to 2 | Sparrow, Palisade | Small, agile all-rounders. The Sparrow every pilot starts in is one. |
| Torpedo Craft | 1 | Nightjar | Small missile boats that hit far above their size against big hulls. |
| Gunship | 2 | Halberd | The first real warships: turrets, fixed guns and missiles together. |
| Hauler | 2 to 4 | Peregrine, Driftcomber, Mule, Tradewind | Cargo hulls, from a colony courier to huge container ships. |
| Mender | 2 to 3 | Suture, Lifeline | Support hulls that repair allies with remote repair projectors. |
| Dredge | 3 | Quarrier | Heavy industrial miners with booms and an on-board furnace. |
| Raider | 3 | Carrion | The Hollow Crown's own warship: fast and heavily armored. |
| Warship | 3 | Bulwark, Quiver | Line warships with medium turrets and layered defenses. |
| Doctrine Ship | 4 | Herald | Fleet leaders that broadcast doctrine buffs to clanmates. |
| Heavy Warship | 4 | Ironclad | A wall of turrets at warship speed. |
| Ship of the Line | 5 | Monolith | Heavy broadside ships with large turrets and huge buffers. |
| Fighter Tender | 6 | Colossus | City-sized hulls that launch wings of strike fighters. |
| Flagship | 7 | Hegemon | The heaviest warships, with a Spinal Lance along the keel. |
| Behemoth | 8 to 9 | Asterion, Borealis, Nacre, Ophion, Meridian | Moon-sized hulls, each built for one role. They moor at orbital berths only. |
| Worldship | 10 | Tellurion | A machine world: the largest hull in the cluster. It never docks. |
From the game's own data
- Bigger is not simply better. Small hulls are fast, agile, quick to lock and hard to hit with big guns; big hulls carry huge buffers and heavy weapons but turn slowly, align slowly and are easy targets.
- Many hulls have a role bonus, shown in their role line: more turret or missile damage, stronger remote repairs, faster charting, more salvage and so on.
- Strike Craft, the fighters a Fighter Tender launches, are not flown by pilots.

The ship roster#
Every released hull, in tier order. High slots are listed by size and mount type (see slots). Cargo is the base hold before modules and skills. Hulls marked Vanguard (Driftcomber and Astrolabe) are Vanguard Charter hulls.
| Hull | Class | Tier | Role | High slots | Mid | Low | Cargo | Skills needed |
|---|---|---|---|---|---|---|---|---|
| Fairwind | Circuit Ship | 1 | Circuit Ship: the fastest hull in the cluster, built to do one job and nothing else | 3 S fixed | 2 | 1 | 20 m³ | Racing 5 |
| Dartwing | Outrider | 1 | Outrider: the fastest hull in the cluster, built to run targets down | 3 S fixed | 2 | 1 | 30 m³ | Piloting 10 |
| Wayfarer | Pathfinder | 1 | Pathfinder: +25% seal-breaking chance, +15% salvage chance, fast warp | 2 S fixed, 1 S utility | 3 | 2 | 260 m³ | Exploration 20 |
| Delver | Prospector | 1 | Prospector: two mining lasers and a big ore hold | 2 S utility, 1 S fixed | 2 | 2 | 450 m³ | Mining 5 |
| Sparrow | Skirmisher | 1 | Starter multirole skirmisher: guns, a missile rack and a forgiving airframe | 2 S fixed, 1 S missile | 2 | 2 | 60 m³ | None |
| Nightjar | Torpedo Craft | 1 | Torpedo craft: +35% missile damage, +50% signature shroud strength | 3 S missile, 1 S fixed | 2 | 1 | 70 m³ | Missiles 20, Piloting 10 |
| Halberd | Gunship | 2 | Gunship: turrets, fixed guns and a missile bay | 2 S turret, 2 S fixed, 2 S missile | 3 | 3 | 160 m³ | Gunnery 15 |
| Peregrine | Hauler | 2 | Colony courier: 1,400 m³ hold, salvage utility and two defensive guns | 2 S fixed, 1 S utility | 2 | 3 | 1,400 m³ | Trading 5 |
| Suture | Mender | 2 | Mender: two medium repair projectors, +60% remote repair amount, +20% battery charge rate | 2 M utility, 2 S fixed | 4 | 3 | 180 m³ | Engineering 25, Defense 10 |
| Gleaner | Pathfinder | 2 | Salvage pathfinder: three salvage mounts, +25% salvage chance, a 900 m³ hold | 2 S utility, 1 M utility, 1 S fixed | 3 | 2 | 900 m³ | Salvaging 10, Piloting 5 |
| Furrow | Prospector | 2 | Planetary harvester: +30% harvest yield, four low slots for augers and a 1,400 m³ hold | 2 S fixed, 1 S utility | 2 | 4 | 1,400 m³ | Harvesting 10, Piloting 5 |
| Hewer | Prospector | 2 | Prospector: three mining arms and a 1,800 m³ ore hold, the step between Delver and Quarrier | 3 S utility, 1 S fixed | 2 | 3 | 1,800 m³ | Mining 15 |
| Palisade | Skirmisher | 2 | Shield escort: four small weapons, steady handling and stronger shields | 2 S fixed, 2 S missile | 3 | 2 | 45 m³ | Gunnery 8, Piloting 5 |
| Quarrier | Dredge | 3 | Dredge: three heavy mining booms and an on-board furnace | 3 M utility, 2 S turret | 3 | 3 | 8,000 m³ | Mining 30 |
| Driftcomber (Vanguard) | Hauler | 3 | Vanguard salvage tender: a fifth Salvage Yard tug and +10% expedition hauls while docked at the yard, +20% salvage, 9,000 m³ hold | 2 S turret, 2 M utility | 3 | 4 | 9,000 m³ | Reclamation 10, Salvaging 20 |
| Mule | Hauler | 3 | Hauler: a 12,000 m³ hold on an open truss spine, with two chin mounts for mining lasers | 1 S turret, 2 S utility | 3 | 4 | 12,000 m³ | Trading 15 |
| Lifeline | Mender | 3 | Mender: +100% remote repair amount, +25% battery charge rate | 4 M utility, 2 S turret | 5 | 4 | 600 m³ | Engineering 35, Defense 30 |
| Astrolabe (Vanguard) | Pathfinder | 3 | Vanguard survey yacht: charts 25% faster with 50% more survey range, fast cruise, light guns | 2 S fixed, 1 S utility | 4 | 2 | 600 m³ | Cartography 5, Exploration 10 |
| Longsight | Pathfinder | 3 | Deep pathfinder: +40% seal-breaking chance, +15% salvage chance, the fastest warp drive in the cluster | 2 S fixed, 2 S utility | 4 | 3 | 520 m³ | Exploration 40, Navigation 20 |
| Carrion | Raider | 3 | Pirate raider: +15% turret damage, fast and heavily armored for a warship | 4 M turret, 2 M missile | 4 | 5 | 520 m³ | Gunnery 35, Piloting 35 |
| Bulwark | Warship | 3 | Line warship: four medium turrets behind layered armor | 4 M turret, 2 M missile | 4 | 4 | 450 m³ | Gunnery 30, Piloting 25 |
| Quiver | Warship | 3 | Missile warship: four medium launchers, +15% missile damage, lighter armor than a Bulwark | 4 M missile, 2 M turret | 4 | 4 | 480 m³ | Missiles 30, Piloting 20 |
| Herald | Doctrine Ship | 4 | Doctrine ship: +50% doctrine broadcast strength and range | 4 M turret, 2 M missile | 6 | 5 | 800 m³ | Leadership 40, Gunnery 40 |
| Tradewind | Hauler | 4 | Heavy container hauler: twice a Mule's container stack, a 24,000 m³ hold, two defensive turrets and a chin pair for mining lasers or salvagers | 2 S turret, 2 S utility | 4 | 5 | 24,000 m³ | Trading 30, Navigation 20, Piloting 15 |
| Ironclad | Heavy Warship | 4 | Heavy warship: a wall of turrets at warship speed | 4 M turret, 2 L turret, 2 M missile | 5 | 5 | 700 m³ | Gunnery 50, Defense 40 |
| Monolith | Ship of the Line | 5 | Ship of the line: eight heavy turrets, fights broadside | 8 L turret, 2 M turret, 2 L missile | 6 | 6 | 1,200 m³ | Gunnery 70, Defense 60 |
| Colossus | Fighter Tender | 6 | Fighter tender: city-sized, launches strike-fighter wings | 12 L turret, 8 M turret | 8 | 8 | 20,000 m³ | Leadership 80, Gunnery 80 |
| Hegemon | Flagship | 7 | Flagship: +20% turret damage, Spinal Lance hardpoint, +100% doctrine broadcast range | 10 L turret, 6 M turret, 1 L fixed | 8 | 8 | 30,000 m³ | Leadership 90, Gunnery 85, Defense 85 |
| Asterion | Behemoth | 8 | Siege behemoth: armored line breaker, spinal lance, orbital berths only | 12 L turret, 2 M turret, 1 L fixed | 8 | 8 | 140,000 m³ | Piloting 95, Leadership 95, Gunnery 95, Defense 90 |
| Borealis | Behemoth | 8 | Fleet bulwark: +40% doctrine strength, +200% doctrine range, orbital berths only | 10 L turret, 2 M turret | 9 | 8 | 160,000 m³ | Piloting 95, Leadership 99, Engineering 90, Defense 95 |
| Nacre | Behemoth | 8 | Fleet sanctuary: +60% remote repairs, +100% doctrine range, orbital berths only | 8 L turret, 2 M turret, 4 M utility | 8 | 8 | 180,000 m³ | Piloting 95, Leadership 90, Engineering 95, Defense 95 |
| Ophion | Behemoth | 8 | Arsenal behemoth: six siege launchers, +35% missile damage, orbital berths only | 8 L turret, 6 L missile | 8 | 8 | 200,000 m³ | Piloting 95, Gunnery 99, Defense 95, Engineering 90 |
| Meridian | Behemoth | 9 | Expedition foundry: +30% remote repair, 400,000 m³ hold, orbital berths only | 12 L turret, 4 M utility | 9 | 9 | 400,000 m³ | Piloting 99, Engineering 99, Leadership 95, Defense 95 |
| Tellurion | Worldship | 10 | Worldship: moon-sized machine world, Tidal Shear Array, drone carousel; never docks | 16 L turret, 8 M turret, 1 L fixed | 10 | 10 | 600,000 m³ | Piloting 99, Leadership 99, Gunnery 95, Defense 99, Engineering 95 |
From the game's own data
The skills listed are needed to fly the hull. Its modules have their own requirements (see fitting), and the Skills window shows what each new level unlocks.
The hangar#
Dock at any station and open Hangar from the station's services. It is where you manage the ships and items you keep at that station.
- Ships in this hangar
- Every assembled ship you have docked here, with its class, a one-line summary, its bond status and any skill it still needs. The Active ship is the one you undock in; Board makes another ship active.
- Ship detail
- Select a ship to see its full specifications (defense, battery, navigation, hold and profile), its slot layout, what is fitted and its estimated value, and its hull mastery rank. Earn skill XP while flying a hull to rank it up.
- Repair ship
- Repairs the active ship's armor and hull for a fee. Shields recharge by themselves.
- Cargo hold
- What is aboard the active ship, with a meter of used capacity. Unload moves a stack to the station hangar.
- Station hangar
- Items you keep at this station. Load moves a stack into the active ship's hold; modules can be fitted and packaged hulls assembled straight from here.
- Search
- One box searches ships, hull names and classes, items and categories. Press / to jump to it.
- Stored ships by station
- Every ship you own anywhere, grouped by station. See stored ships.

Buying a ship#
New hulls are sold packaged on station markets, like any other item. A packaged hull is cargo; you assemble it into a ship at a station.
- Check the skills
Look up the hull in the roster. You can buy a hull before you can fly it, but you cannot undock in it until you meet its skill requirements.
- Find it on the Market
Open Market, pick the Ships category (the hull class chips narrow it down) and select the hull. The detail view shows its stats, its requirements (met or not), the price history and the order book.
- Buy it
Buy from a sell order. The packaged hull lands in this station's hangar.
- Assemble it
In the Hangar, find the packaged hull among your items and choose Assemble. It becomes an empty ship in this hangar.
- Board and fit it
Press Board to make it your active ship, then open Fitting to put modules in its slots.
- Small hulls are on sale at almost every station. Bigger hulls are stocked at larger hubs, and the biggest warships mostly at the trade hubs of the faction home systems. Stock restocks over a few hours, and other pilots sell hulls too.
- Not every hull is sold. Fighter Tenders, Flagships, Behemoths and the Worldship are built by industrialists, so look for them on the market from other pilots or build one yourself. See manufacturing.
- The Carrion, the Hollow Crown's own raider, turns up rarely and expensively in pirate markets.
- Vanguard hulls are sold at Vanguard berths and in the Vanguard store to Charter members, for credits.
- If you lose your last flyable ship at home, the Accord fleet office issues you a free Sparrow. See losing a ship.
Fitting#
Open Fitting while docked with your active ship in the hangar. The window shows your high, mid and low slots on the left and the ship's attributes on the right.

- Pick a slot
Click a slot. On the 3D ship behind the window, the matching hardpoint lights up.
- Choose a module
The picker below lists every module in this station's hangar. Modules that cannot go in that slot are dimmed with the reason: wrong slot, wrong mount or size, or a skill you are missing.
- Fit it
Press Fit. The module moves from the hangar onto the ship; whatever was in the slot goes back to the hangar. Unfit empties the slot.
- Set its mode
For a module you switch on (a booster, repairer, thruster or jammer), choose its activation mode in the picker. See module modes.
Reading the attributes#
Every number updates as you fit: shield, armor and hull, armor resistances, shield regeneration, the battery (capacity, voltage, charge rate and peak output), Fitted draw (the average power your guns and modules use while all running), top speed, boost speed, agility, warp speed, cargo, signature, lock range and your gunnery and mining bonuses.
- You can only fit the active ship, while docked, from modules in the same station's hangar. Buy modules on the Market first.
- Removing a module that enlarges your hold is refused while the cargo would no longer fit. Unload first.
- Only one armor plating can be fitted per hull, and it shows on the hull.
- A newly assembled hull is empty: fit it before you undock.
Slots, mounts and sizes#
Each hull has three rows of slots. What a module can do decides which row it goes in.
- High slots
- Weapons and utility tools: guns, turrets, missile launchers, mining lasers, salvagers, remote repair projectors and seal breakers. Each high slot is a physical hardpoint on the hull with a mount type and a size.
- Mid slots
- Shields and electronics: shield regenerators and amplifiers, barrier weaves, thrusters, point defense and flak, countermeasures, jammers, scanners, doctrine arrays and the signature shroud.
- Low slots
- Armor and engineering: plates and platings, armor repair arrays, structural bracing, battery banks and regulators, hold extensions and planetary augers.
Mount types#
| Mount | What it is | Takes |
|---|---|---|
| Fixed | A gun locked along the nose. It aims within a small gimbal cone, so you aim the ship. | Small guns, mining lasers and some tools |
| Turret | A rotating weapon that tracks targets on its own across its arc of fire. | Turreted guns, medium and large launchers, remote repair projectors and salvage rigs |
| Missile | A launcher bay. Missiles guide themselves to a locked target. | Missile launchers, swarm pods and torpedo racks |
| Utility | A tool mount. | Mining lasers and bores, salvagers, projectors and seal breakers |
Sizes#
- Hardpoints are S (small), M (medium) or L (large). Weapons must match the size exactly: a medium turret takes only medium guns.
- Salvagers and seal breakers are the exception: a small one also fits a larger mount.
- Small guns fit both fixed and turret mounts; small launchers need a missile mount. Medium and large guns are turret-only, and medium and large launchers fit missile and turret mounts.
- Hulls of the same class can lay out their hardpoints very differently. Check the slot layout in the hangar's ship detail or in the roster before you buy modules.
Module activation modes#
Every module you switch on (not mining lasers or flares) has an activation mode that decides when it runs. Modes are saved per ship and per slot. Guns and launchers have their own fire settings (With Engage or Manual only, and a target size): see weapon fire modes.
- Manual
- Only you switch it on and off: its number key (1 to 9), a click or a tap on the module. No badge.
- Auto on damage
- Badge A. The module switches itself on when its layer drops below a threshold (70% by default; 50%, 60%, 70%, 80%, 90% offered) and stays on until the layer is full. It never runs the battery below 20%. Offered for shield regenerators (shield) and armor repair arrays (armor).
- With Engage
- Badge E. Switched on when you press Engage (V).
| Module | Slot | Default | Modes offered |
|---|---|---|---|
| Barrier Regenerator | Mid | Auto on damage | Manual, Auto on damage, With Engage |
| Burst Thruster | Mid | Manual | Manual, With Engage |
| Sensor Jammer | Mid | With Engage | Manual, With Engage |
| Deep Scanner | Mid | Manual | Manual, With Engage |
| Nanite Repair Array | Low | Auto on damage | Manual, Auto on damage, With Engage |
| Barrier Projector M | High | Manual | Manual, With Engage |
| Nanite Projector M | High | Manual | Manual, With Engage |
| Siege Doctrine Array | Mid | Manual | Manual, With Engage |
| Rampart Doctrine Array | Mid | Manual | Manual, With Engage |
| Vector Doctrine Array | Mid | Manual | Manual, With Engage |
| Seal Breaker | High | Manual | Manual, With Engage |
| signature shroud | Mid | Manual | Manual, With Engage |
| Heavy Barrier Regenerator | Mid | Auto on damage | Manual, Auto on damage, With Engage |
| Nanite Surge Array | Low | Auto on damage | Manual, Auto on damage, With Engage |
| Wideband Jammer | Mid | With Engage | Manual, With Engage |
| Survey Array | Mid | Manual | Manual, With Engage |
| Overdrive Thruster | Mid | Manual | Manual, With Engage |
From the game's own data

- Set a mode in Fitting (pick the slot), or right-click a module on the HUD (hold it on a touch screen). It works docked or in space.
- Auto runs on the server, so it keeps working with the game window in the background and on every device.
- Switching an auto module on by hand overrides the 20% battery floor for that run; it still stops when the layer is full.
- Engage fires every weapon set With Engage (all of them, unless you changed one). It switches on only the modules set With Engage, so a booster no longer drains your battery in every fight before your shields are even hit.
- Refitting a slot with a different module resets that slot to the new module's default.
Insurance: Hull Bonds#
The Keelwright Mutual, the Kheper Syndicate's shipwrights' mutual, bonds hulls against loss. You pay a premium for a 14-day term; if the hull is destroyed, the Mutual pays you a share of its keel value, the value of the raw materials in it. Bond a hull in the Hangar while docked where the hull is (Bond this hull in the ship's detail).
| Tier | Pays (of keel value) | Premium per term | Notes |
|---|---|---|---|
| Salvage Bond | 40% | 5% | Cheap cover for hulls you expect to lose. |
| Keel Bond | 70% | 12% | The usual cover for a working hull. |
| Full Keel Bond | 100% | 25% | Pays the whole keel value. |
From the game's own data
What changes the price#
- Pilot level discount: premiums drop steadily as your pilot level rises, to 30% off at level 99.
- Claims record: each paid claim on your account in the last 14 days adds 20% to premiums, up to +100%.
- Large-hull surcharge: Fighter Tenders ×1.25, Flagships ×1.5, Behemoths ×1.5.
- Renewing: renew the same tier once 14 days or less are left, to pay up to 28 days ahead. Renewing keeps your cover with no new waiting period. Buying a different tier replaces the bond and forfeits the rest of the old term.
- Auto-renew (opt in) renews from your wallet on the bond's last day, as long as the premium stays under the limit you agreed to.
Modules and cargo#
- Fitted modules can be added: covered at the same share of their materials value. Named Crown-Forged and Exodus-Pattern modules count only at their standard module's materials; Legendary and Exotic modules, and modules no NPC buys, are not covered.
- Cargo can be added up to a declared value (capped by hull class): 8% of it per term, paid up to what the lost cargo would fetch from NPC buyers. Cargo counts only once it has been aboard in space for 10 minutes, and an account can declare up to ₡50,000,000 of cargo cover per week.
- Anything that drops into the wreck is never paid (it can still be looted). Contraband, relics, trophies, blueprints and account goods are not covered, and Job Board courier goods are covered by their collateral instead.
Claims#
- A new or re-tiered bond pays nothing for 30 minutes after it is issued. Renewals keep their cover.
- Losses with no hostile involved (a crash, re-entry heat) pay 50%; losses while marked a criminal pay 50% (both together: a quarter).
- No payout when a pilot on your own account took part in the kill, for self-inflicted losses, or when the Accord Marshals destroy you while you are a criminal.
- Payouts are credits, paid straight to your wallet.
- The Sparrow and Tellurion cannot be bonded: the Accord fleet office replaces Sparrows for free, and the Mutual will not write a policy on a worldship.
Keel values and premiums for every bondable hull
| Hull | Keel value | Keel Bond premium (level 1) | Keel Bond pays | Keel Bond premium (level 99) | Full Keel premium (level 1) | Full Keel pays |
|---|---|---|---|---|---|---|
| Fairwind | ₡32,842 | ₡3,942 | ₡22,989 | ₡2,759 | ₡8,211 | ₡32,842 |
| Dartwing | ₡35,420 | ₡4,251 | ₡24,794 | ₡2,976 | ₡8,855 | ₡35,420 |
| Wayfarer | ₡60,186 | ₡7,223 | ₡42,130 | ₡5,056 | ₡15,047 | ₡60,186 |
| Delver | ₡35,284 | ₡4,235 | ₡24,698 | ₡2,964 | ₡8,821 | ₡35,284 |
| Nightjar | ₡75,007 | ₡9,001 | ₡52,504 | ₡6,301 | ₡18,752 | ₡75,007 |
| Halberd | ₡140,986 | ₡16,919 | ₡98,690 | ₡11,843 | ₡35,247 | ₡140,986 |
| Peregrine | ₡84,496 | ₡10,140 | ₡59,147 | ₡7,098 | ₡21,124 | ₡84,496 |
| Suture | ₡195,129 | ₡23,416 | ₡136,590 | ₡16,391 | ₡48,783 | ₡195,129 |
| Gleaner | ₡67,152 | ₡8,059 | ₡47,006 | ₡5,641 | ₡16,788 | ₡67,152 |
| Furrow | ₡79,979 | ₡9,598 | ₡55,985 | ₡6,719 | ₡19,995 | ₡79,979 |
| Hewer | ₡93,170 | ₡11,181 | ₡65,218 | ₡7,827 | ₡23,293 | ₡93,170 |
| Palisade | ₡46,235 | ₡5,549 | ₡32,364 | ₡3,884 | ₡11,559 | ₡46,235 |
| Quarrier | ₡1,261,324 | ₡151,359 | ₡882,926 | ₡105,952 | ₡315,331 | ₡1,261,324 |
| Driftcomber | ₡724,728 | ₡86,968 | ₡507,309 | ₡60,878 | ₡181,182 | ₡724,728 |
| Mule | ₡767,361 | ₡92,084 | ₡537,152 | ₡64,459 | ₡191,841 | ₡767,361 |
| Lifeline | ₡1,253,463 | ₡150,416 | ₡877,424 | ₡105,291 | ₡313,366 | ₡1,253,463 |
| Astrolabe | ₡151,352 | ₡18,163 | ₡105,946 | ₡12,714 | ₡37,838 | ₡151,352 |
| Longsight | ₡284,279 | ₡34,114 | ₡198,995 | ₡23,880 | ₡71,070 | ₡284,279 |
| Carrion | ₡1,618,623 | ₡194,235 | ₡1,133,036 | ₡135,965 | ₡404,656 | ₡1,618,623 |
| Bulwark | ₡1,006,979 | ₡120,838 | ₡704,885 | ₡84,587 | ₡251,745 | ₡1,006,979 |
| Quiver | ₡1,001,287 | ₡120,155 | ₡700,900 | ₡84,109 | ₡250,322 | ₡1,001,287 |
| Herald | ₡6,753,989 | ₡810,479 | ₡4,727,792 | ₡567,336 | ₡1,688,498 | ₡6,753,989 |
| Tradewind | ₡3,142,409 | ₡377,090 | ₡2,199,686 | ₡263,963 | ₡785,603 | ₡3,142,409 |
| Ironclad | ₡5,590,033 | ₡670,804 | ₡3,913,023 | ₡469,563 | ₡1,397,509 | ₡5,590,033 |
| Monolith | ₡20,448,635 | ₡2,453,837 | ₡14,314,044 | ₡1,717,686 | ₡5,112,159 | ₡20,448,635 |
| Colossus | ₡298,595,112 | ₡44,789,267 | ₡209,016,578 | ₡31,352,487 | ₡93,310,973 | ₡298,595,112 |
| Hegemon | ₡1,042,219,442 | ₡187,599,500 | ₡729,553,609 | ₡131,319,650 | ₡390,832,291 | ₡1,042,219,442 |
| Asterion | ₡4,285,083,426 | ₡771,315,017 | ₡2,999,558,398 | ₡539,920,512 | ₡1,606,906,285 | ₡4,285,083,426 |
| Borealis | ₡4,907,901,346 | ₡883,422,243 | ₡3,435,530,942 | ₡618,395,570 | ₡1,840,463,005 | ₡4,907,901,346 |
| Nacre | ₡4,288,558,406 | ₡771,940,514 | ₡3,001,990,884 | ₡540,358,360 | ₡1,608,209,403 | ₡4,288,558,406 |
| Ophion | ₡4,671,630,720 | ₡840,893,530 | ₡3,270,141,504 | ₡588,625,471 | ₡1,751,861,520 | ₡4,671,630,720 |
| Meridian | ₡7,670,060,488 | ₡1,380,610,888 | ₡5,369,042,341 | ₡966,427,622 | ₡2,876,272,683 | ₡7,670,060,488 |
Premiums are per 14-day term and include the large-hull surcharge. Your quote in the Hangar also reflects your claims record and any module or cargo cover. From the game's own data
Insurance: Replacement cover#
The Keelwright Mutual also writes replacement cover: if the hull is destroyed, the Mutual buys you the same hull (and on Full Replacement, every covered module that was destroyed) from sell orders on the market and delivers it to your home station, assembled and fitted where you can fit it. It never makes a ship out of thin air: every claim is a real purchase from pilots' and NPC sell orders, so ship builders keep selling. Insure a hull in the Hangar while docked where it is (Insure in the ship's detail).
| Cover | What it replaces |
|---|---|
| Hull Replacement | The Mutual buys you the same hull and delivers it home. |
| Full Replacement | The hull and every covered module that was destroyed, refitted. |
From the game's own data
| Where losses are covered | Premium |
|---|---|
| Secure space | 9% |
| Anywhere | 30% |
The insured value is the reference price of the hull and each covered module ×1.25, about what an NPC shelf in Secure space asks. Large hulls carry the same surcharge as Hull Bonds. From the game's own data
How a claim works#
- The Mutual looks for sell orders within 5 jumps of your home station or of the place you were lost, and buys the cheapest units, never above the dearest NPC shelf price. It never buys from your own account or from anyone who took part in the kill, nor from listings made after the loss.
- The hull is assembled at your home station and every replaced module you can fit goes into its slot, with the module modes and munition loads you had. The rest waits in the station hangar.
- A part no seller offers within reach is paid in credits, at most at its assessed value (the same value a Hull Bond uses).
- The Mutual pays at most about 1.1 times the usual trade price for a unit, buys at most 2 hulls a week from any one seller (and the accounts linked to it), and spends within a daily budget: a claim past it waits for the next day, oldest first.
- Claims are paid from the Mutual's reserve, which premiums fill. 15% of every premium never reaches the reserve, so the reserve can never pay out more than comes in. If it runs short, the rest of your replacement follows in order as it refills.
What is not covered#
- Only losses to hostile pilots and NPCs count: not crashes or re-entry, not self-inflicted losses, not while you are marked a criminal, and not when a pilot on your own account took part. Nothing is covered in a policy's first 60 minutes.
- A loss to NPCs alone carries a 20% excess, paid from your wallet when the replacement is bought. It counts only when the hull carried a weapon or a defensive module, had been in space at least 10 minutes, was not lost in the system where you bought the policy within 6 hours of buying it, and your account had no other NPC claim in that system that week.
- Modules that drop into the wreck are not replaced, nor named Crown-Forged or Exodus-Pattern modules, Legendary and Exotic modules, or anything found rather than bought.
- A policy ends at its first claim. An account can have 3 replacement claims a week, and each claim in the last 30 days adds 50% to premiums.
- A hull carries one kind of cover at a time: a Hull Bond or replacement cover. The Sparrow, the Worldship, Vanguard hulls and Legendary hulls can't take replacement cover.
Ship builds and rebuying#
Save a fitted ship as a build (Save build in the Hangar's ship detail, or Save active ship as a build on the Market's Builds tab). A build keeps the hull, every module in its slot, module modes and munition loads. You can keep 40 builds, and the ship you lose last is remembered automatically as Last ship lost.
- Open the Builds tab
Open Market and pick Builds, or press Buy last ship on the screen you see when your ship is destroyed.
- Read the quote
Every part is priced from this station's sell orders, cheapest first. Parts you already have in the hangar are used first (switch it off to buy everything). Missing parts show the cheapest seller within your market reach (or the nearest one past it), with a Route button and a Buy order button. Buying happens at this station.
- Buy it
Buy this build buys every part or nothing. Buy what's available buys what is on sale and leaves the rest. The hull is assembled in the hangar and fitted in the same step.
Stripping a ship#
Strip all modules in the Hangar's ship detail moves every fitted module and the munitions in the hold to the station hangar, in one step. You need to be docked where the ship is, and whatever else is in the hold must still fit the bare hull.
Stored ships#
Ships stay where you leave them. The Stored ships by station list at the bottom of the Hangar shows every assembled ship you own, grouped by the station it is docked at, with the number of ships and hangars.
- The station you are docked at opens first; the others fold open on a click.
- With more than eight ships, a search box finds a ship by name or hull, or a whole station by name.
- Set course to hangar plots the route to a station that holds your ships, ready for Travel.
- The list updates by itself as you buy, assemble, lose or move ships.
- Packaged hulls are items, not ships: they stay in the station hangar's item list until you assemble them.
To move a ship, undock in it and fly it to the new station. Packaged hulls can also be hauled as cargo in a big enough hold (their packaged volume is large), or traded to another pilot with a contract.
Liveries#
A livery repaints a ship. By default every hull wears your faction's colors (or your clan's). Pick a livery in Fitting, under Livery, for the active ship; the first swatch puts the default colors back. Liveries belong to the account, so every pilot on it can use one you own.


| Livery | How to get it | Look |
|---|---|---|
| Vanguard Ivory | Included with the Vanguard Charter | The colors of the first ships through the wormhole. |
| Nebula Veil | Included with the Vanguard Charter | Deep violet hull with a glowing magenta trim. |
| Solar Wind | Included with the Vanguard Charter | Burnt orange plating, charred panels and a sun-gold accent. |
| Void Runner | Included with the Vanguard Charter | Near-black hull with cold cyan running lights. |
| Moonpearl | Included with the Vanguard Charter | Warm pearl over plum-gray with a lavender sheen at the edges and softly breathing lavender trim. |
| Nightprism | Included with the Vanguard Charter | A near-black thin-film coat that slides through teal, violet and gold as the hull turns, with mint light running aft along the trim. |
| Cold Chrome | Included with the Vanguard Charter | Bright metal-flake silver over graphite with electric-blue accents and a blue drive. |
| Tidal Lumen | Included with the Vanguard Charter | Deep-water teal with a pearl sheen and bioluminescent bands that roll aft along the trim. |
| Rose Anodize | Included with the Vanguard Charter | Anodized rose-copper flake over dark cocoa with champagne trim. |
| Standard Bearer | Included with the Vanguard Charter | Parade ivory flake and deep navy under a gold spine and chevrons that glow in slow time. |
| Glacier | 300 Aether in the Vanguard store | Ice-blue plating from the frozen fringe worlds. |
| Crimson Comet | 300 Aether in the Vanguard store | Racing red with an amber flash. |
| Jade Circuit | 400 Aether in the Vanguard store | Green alloy traced with bright circuitry. |
| Gilded Exodus | 600 Aether in the Vanguard store | Gold leaf over dark bronze. Subtle it is not. |
| Grid Marker | Earned in play | Start-line white, black roundel and hazard orange. Awarded for a podium finish at a Racing Port. |
| Checkered Flare | Earned in play | Midnight blue under chevrons, with a cold blue drive. The mark of a race winner. |
| Tracker's Stripe | Earned in play | Gunmetal with a blaze-orange tracker's stripe. Bought with Bounty Points at a Bounty Office. |
| Crownbane | Earned in play | Bone white over black with blood-red chevrons. For a hunter of Hunting 75 and above, bought with Bounty Points. |
| Marshal's Dress | Earned in play | Accord parade ivory over Marshal navy, with a gold spine and chevrons. Bought with Merits at a Solari Accord station. |
| Guild Hazard | Earned in play | Syndicate safety amber over charcoal with black hazard chevrons. Bought with Merits at a Kheper Syndicate station. |
| Crimson Muster | Earned in play | Dominion gunmetal and black under a crimson spine and chevrons. Bought with Merits at a Vanta Dominion station. |
| Harbor Signal | ₡250,000 at any station | Harbor-pilot navy over pale gray with signal-yellow trim. Sold at every station for credits. |
| Dune Courier | ₡1,500,000 at any station | Desert sand and espresso with teal courier chevrons. Sold at every station for credits. |
| Apex Line | Reach Racing 50 | Acid lime over graphite with white apex chevrons and a lime drive, seen from the far end of any grid. For a pilot of Racing 50. |
| Duskhide | Complete 50 hunting tasks (On the Trail) | Umber hide, a near-black spine and amber chevrons. For a hunter with fifty contracts filled. |
| Seam Ochre | Reach Mining 50 | Ochre work paint over slate with bone-white hazard chevrons. For a miner of Mining 50. |
| Verdigris Archive | Crack 25 derelict caches (Relic Hunter) | Weathered verdigris over dark bronze with bright copper trim, the color of old Exodus wreckage. For a Relic Hunter. |
| Event Horizon | Earned in play | A black hull with a gold accretion stripe and a white-hot drive. Redeemed from an Event Horizon Livery Kit, found beyond a singularity. |
| Wingmate Chevron | Recruit a Wingmate: a recruit reaches Wingmate | Squadron gray with orange formation chevrons. For bringing a wingmate into the cluster. |
| Vanguard Recruiter | Recruit a Wingmate: a recruit reaches Vanguard | Midnight blue, a gilded spine and chevrons, and a gold drive. For a recruit who joined the Vanguard. |
| Squadron Lead | Recruit a Wingmate: 3 qualified recruits | Olive drab with bone chevrons and a spine stripe, the lead ship's paint. Three qualified recruits. |
| Emberwing | Recruit a Wingmate: 10 qualified recruits | Charred hull, ember chevrons and a drive that burns orange. Ten qualified recruits. |
| Commander's Gilt | Recruit a Wingmate: 25 qualified recruits | Parade white and navy with gilt chevrons and an ice-blue drive. Twenty-five qualified recruits. |
From the game's own data
- Credit liveries are bought right in the Fitting window from your wallet, and are yours for good.
- Earned liveries unlock the first time a pilot who meets the goal opens the paint list.
- Some paints have special finishes (metallic, pearl or iridescent) or glowing animated trim, and some change the color of your engine glow. 6 liveries have a finish or trim.
- Locked liveries show in the picker with a small mark and the way to unlock them when you hover.


Something missing or out of date? Tell us on our Discord. More answers in the FAQ.